Description
Spring 2025
In this project you will explore a vulnerability of the Border Gateway Protocol (BGP).
Specifically, your goal is to recreate a BGP Hijacking attack where a “rogue” AS (autonomous
system) hijacks a prefix from another AS, thereby “stealing” traffic.
As discussed in Lesson 4, “An AS is a connected group of one or more IP prefixes run by one or
more network operators which has a SINGLE and CLEARLY DEFINED routing policy.” An AS can
be an Internet Service Provider (ISP), an IXP (where ISP’s and CDN’s exchange local traffic), or a
CDN (e.g., Netflix and Google). Each AS has border routers that utilize BGP to exchange routing
information with one another.
The prefixes advertised by BGP are used to implement routing policies, which makes cooperation
amongst ASs very important. The flexibility and scalability that BGP allows, however, comes with
a cost in security. From Wikipedia:
By design, routers running BGP accept advertised routes from other BGP routers by default. This
allows for automatic and decentralized routing of traffic across the Internet, but it also leaves the
Internet potentially vulnerable to accidental or malicious disruption, known as BGP hijacking. Due
to the extent to which BGP is embedded in the core systems of the Internet, and the number of
different networks operated by many different organizations which collectively make up the
Internet, correcting this vulnerability (such as by introducing the use of cryptographic keys to
verify the identity of BGP routers) is a technically and economically challenging problem.
What Is BGP Hijacking?
BGP hijacking occurs when an attacker attempts to re-route (steal) traffic by issuing a BGP Route
Advertisement for an IP prefix that is owned or controlled by another AS. Such an attack causes
routing disruptions and connectivity issues for individual hosts, networks, and sometimes even
entire countries. A simple search will turn up lots of information about notable public incidents.
Because BGP favors shorter routes and more specific routes by design, a hijacking event can occur
(either deliberately or by accident) when an AS advertises a prefix for which it is not the true
originator and that prefix:
• duplicates a correct advertisement, but has a shorter path
• is more specific than another correct advertisement
3
What happens when BGP is hijacked?
When a hijack occurs, it can cause:
• dropped traffic (causing disruption),
• re-routed traffic (allowing an attacker to, for example, steal credentials), and/or
• increased latency (causing performance degradation)
Even though the victim AS thinks the route is shorter, the reality is it may be a lot longer than the
previous advertised routes. The best-case scenario of an attack is that the hijacked route will only
increase latency by steering traffic to a much longer route. The worst case scenario of an attack
is that an attacker re-routes traffic to a malicious site to steal confidential information.
BGP hijacking in the real world
Attackers can use BGP hijacking in the real world to steal confidential data or electronic assets,
such as when a Russian government-controlled telecom re-routed large chunks of network traffic
belonging to MasterCard, Visa, and more than two dozen other financial services in 2017 or when
hackers stolen almost $2m from South Korean cryptocurrency platform KLAYswap in 2022.
Hijack incidents can also occur when routes “leak” by mistake, such as when AS55410 (controlled
by Vodafone Idea Ltd.) mistakenly announced over 30,000 BGP prefixes causing a 13x spike in
inbound traffic to their network or when Con Edison “stole the Internet” for most of a full day.
Read What is BGP hijacking? For a terrific overview.
4
Goal
In this project, which is based on the BGP Path Hijacking Attack Demo included in the Mininet
project, we will explore some of the vulnerabilities of Border Gateway Protocol (BGP). In
particular, we will see how BGP is vulnerable to abuse and manipulation through a class of attacks
called BGP hijacking attacks. A malicious AS can mount these attacks through false BGP
announcements from a rogue AS, causing victim ASes to route their traffic bound for another AS
through the malicious AS. This attack succeeds because the false advertisement exploits BGP
routing behavior by advertising a shorter path to reach a particular prefix, which causes victim
ASes to attempt to use the newly advertised (and seemingly better!) route.
In this project you will explore a vulnerability of the Border Gateway Protocol (BGP).
Specifically, your goal is to recreate a BGP Hijacking attack where a “rogue” AS (autonomous
system) hijacks a prefix from another AS, thereby “stealing” traffic.
5
BGP Hijacking Simple Demo
This is a demo to help better understand BGP Hijacking on mininet.
Part 1: Background reading
Please read the resources, and example BGP router configurations. And the project slide.
A. Browse this paper as a reference for subsequent tasks and for some important background
on Prefix Hijack Attacks.
B. Refer to this resource on configuring a BGP router with Quagga. Also, the FRR docs for zebra
can be helpful as well.
C. The “BGP Bible” is here
https://www.cisco.com/c/en/us/td/docs/ios/iproute_bgp/command/reference/irg_book.html
Part 2: Demonstration using a Mininet Topology and simulated prefixes/paths
The demo creates the network topology shown below, consisting of four ASes and their peering
relationships. AS4 is the malicious AS that will mount the attack. Once again, we will be simulating
this network in Mininet, however there are some important distinctions to make from our
previous projects. In this setup, each object is not a single host, but an entire autonomous system.
In each AS, a router runs a routing daemon (quagga), communicates with other ASes using BGP
(bgpd), and configures its own isolated set of routing entries in the kernel (zebra). Each AS router
has multiple IP addresses, to connect to the hosts in the AS and to other routers.
6
NOTE: In this topology solid lines indicate peering relationships, and the dotted boxes indicate
the prefix advertised by that AS.
STEPS TO START DEMO
As part of completing this project,
1. Download and unzip the project files. This should create a directory named
BGPHijacking (the “Project Directory”). The file permissions and ownership should be
correct, but if not, adjust them appropriately. It’s okay to freely discuss this aspect of
the project on Edstem.
2. For some of the steps below, you will use the sudo command. You might be asked to
enter your password. If sudo asks you to enter a password, use “mininet.”
3. Open a terminal in the Project Directory. Type: sudo python ./bgp.py. After
loading the topology, the Mininet CLI should be visible. Keep this terminal open
throughout the experiment.
4. Open a second terminal in the Project directory. You will use this terminal to access R1’s
routing daemon (bgpd). Do that by executing the following command: ./connect.sh
5. The connect.sh script uses run.py to connect to the bgpd shell on the router
specified in the variable $router. Accessing the bgpd shell will start quagga, which will
ask for a password. The password is: “en”. Once you have authenticated, you will have
access to the administration shell and R1 routing table. When you get the bgpd-R1#
prompt, type the following command: sh ip bgp
6. You should see output very much like the screen grab below. Notice that AS1 has chosen
the path via AS2 and AS3 to reach the prefix 13.0.0.0/8. NOTE: It may take a minute for
the routes to settle. Try the command until you see all three routes.
7. Next, verify that network traffic is traversing this path. Open a third terminal in the Project
Directory (keeping all other terminals open). In this terminal, you will start a script that
continuously makes web requests from a host within AS1 to a web server in AS3. Type in
the following: ./website.sh
8. Now, you will start a rogue AS (AS4) that will connect directly to AS1 and advertise the
same 13.0.0.0/8 prefix. This will allow AS4 to hijack the prefix due to the shorter AS Path
7
Length. Open a third terminal in the Project Directory (keeping all other terminals open)
and type the following: ./start_rogue.sh
9. Return to the third terminal window and observe the continuous web requests. After the
BGP routing tables converge on this simple network, you will see the attacker start
responding to requests from AS1, rather than AS3.
10. You should also return to the second terminal and rerun the command to print the
routing table. You should now see the fraudulent advertisement for the 13.0.0.0/8
prefix in the routing table, in addition to the longer unused path to the legitimate owner
of the route.
11. Finally, stop the attack by switching to the fourth terminal and typing:
./stop_rogue.sh
12. You should notice a fast reconvergence to the original legitimate route in the third
terminal window, which should now be delivering the original traffic. Additionally, you
can check the BGP routing table again to see that the original path is being traversed.
8
BGP Hijacking Attack
This is the graded part of the project.
Part 1: Simple BGP Hijacking on a customized topology
Your task is to replicate a different topology and attack scenario to demonstrate the effects of a
Prefix Hijack Attack. Your goal is to impersonate true origin AS1 using the false origin AS6.
IMPORTANT NOTE: It’s recommended to build your attack scenario off the demo files. Make a backup
of your demo files so you can refer to them as you modify the files.
STEPS FOR YOUR ATTACK SCENARIO
Topology for the project’s hijack scenario (Figure 2 in the paper)
1. First, according to the topology above taken from Figure 2 in the referenced paper.
Draw a topology map using any drawing tool of your choice. See Slide 7 of the
presentation slides for an example of the level of detail desired in your topology
diagram.
You may hand-draw your topology with pencil and paper and scan or photograph your
drawing. All configuration values drawn on the map must be legible! Save your topology
diagram in PDF format with the name fig2_topo.pdf. You must use this filename as part
of your submission to receive credit for your diagram. We find that if you do your
diagram first, the following steps will be much easier!
2. We recommend making a copy of the code provided to you in the Project files (the full
demo folder). This will make it easier to complete this project, and you will likely find it
9
more approachable if you spend time exploring the demo code and fully understanding
how each part works rather than immediately trying to edit the code.
3. Next, refer to the topology above or in the paper, and create/edit the necessary files to
reconstruct the topology.
(TIPS: BGP message won’t be propagated before establishing connectivity between
nodes)
Please figure out all the config files and python/shell scripts to edit to carry out
the attack on the topology. After modifying all the necessary files, you should
be able to use the commands from the demo to recreate the attack on the new
topology you built in the Project Directory. You can assume the following:
• All links are bidirectional peering links.
• Each AS advertises a single prefix: AS1: 11.0.0.0/8, AS2: 12.0.0.0/8, AS3:
13.0.0.0/8, AS4: 14.0.0.0/8, AS5: 15.0.0.0/8, AS6: 11.0.0.0/8
• The number of hosts in each AS is the same as in the provided code (the
demo).
• You don’t need to modify the helper scripts (run.py, webserver.py,
connect.sh), and you should read through all the shell scripts.
4. Do not change passwords in zebra and conf files. If you change the passwords, the autograder will fail, resulting in 0 for the assignment. All passwords need to follow the demo
and be ‘en’
5. Do not change the names of the config files, follow the pattern when creating new
config files.
6. When complete, you should be able to use the commands from the demo to start a
Rogue AS and demonstrate a similar change in routing table information as was shown
in the demo and see the screen printout (website.sh) as in the demo. Your goal is to
impersonate true origin AS1 using the false origin AS6. The attack should be observed
on hosts connected to AS5.
10
Part 2: Advanced BGP Hijacking on a customized topology
Your task is to demonstrate an advanced BGP Hijacking based on the topology you just created.
Your goal is to also observe the attack on the whole network (besides the true origin).
STEPS FOR YOUR ATTACK SCENARIO
Topology for the project’s hijack scenario (Figure 2 in the paper)
1. After completing part 1, you should be able to see the attack on hosts connected to
AS5. But for hosts connected to, say AS2, they won’t be affected. Why? (You may use
“./website.sh h2-1” to check it)
2. Your goal is to also see the attack on hosts connected to other AS, using AS6 as a false
origin (basically, impersonate AS1 and hijack the whole network).
3. Please read the start_rogue_hard.sh, this is used to carry out the advanced attack.
Create/edit necessary configs according to the start_rogue_hard.sh script.
4. After completion, you should observe hosts connected to AS2. (All the hosts connected
to AS other than AS1 should be able to see the attack)
5. You may use “./website.sh h[2-5]-[1,2]” to check it
6. You must use AS6 as the false origin, you should not modify start_rogue_hard.sh.
7. Tips:
o Try to understand the BGP protocol, different type of BGP Hijacking, and the
rationale behind prefix hijacking.
o Only config modification is needed for this part. You should be able to reuse
your bgp.py and other scripts from part 1.
o You are free to modify the prefix AS6 is broadcasting.
11
Appendix: Configuration Debugging Tips
• Ensure connectivity between routers suing Zebra before working on the BGP messages.
• When viewing the BGP Tables note the “Status codes”. Give your topology enough time
to converge before recreating the hijack simulation portion. It may take a minute or so
for your topology to fully converge. You may continue to check the BGP Tables to
determine whether the topology has converged
• The order that you set up your peering links using addLink() matters. In previous
projects, we manually selected which port on the switch to use. There is an optional
parameter to the addLink() call which allows you to specify which switch port to use. In
this project, you will not use those options. Therefore, the order of the links matters.
• Some of the commands in the boilerplate code may not be necessary to complete the
graded part. Some of it is there just so that you know it exists.
• Check for more descriptive errors in the /logs directory. See the zebra files for the
location of additional log files.
• Run “links” on the Mininet CLI terminal to see if all links are connected and OK.
• Run “net” on the Mininet CLI terminal to see if your ethernet links are connected as you
expect.
• Run “ifconfig -a” on all routers and hosts to ensure that all IP addresses are assigned
correctly.
• Run “sh ip bgp” and “sh ip bgp summary” on all routers.
• The command pingall may not work and that is fine.
• The website.sh may sometimes hang intermittently. If this happens restart the
simulation. We are aware of this issue, and we keep this in mind as we grade your
submission. You will not lose points if website.sh hangs so long as we are eventually
able to run the simulation.
• Again, read all the provided scripts.
12
What to Turn In:
Your BGP Hijacking on a more complex topology
For this project you need to turn in all the files that are necessary for your code to run. Please
submit your code to Gradescope. Be sure to use the -r option so your conf and logs
subdirectories are part of the zip file
Use the following command to zip for t:
zip -r bgph.zip BGPHijacking/
You need to make sure the pdf file fig2_topo.pdf is present inside your BGPHijacking
directory along with all files and directories to run the attack scenario you created. Run the above
zip command when above your project folder. Zip the directory BGPHijacking. All the files
and folders needed must be in the BGPHijacking folder – zip the files in the VM using the Linux
command is recommended.
Please submit the zip archive to Gradescope section “BGP Hijacking”. And please note that:
• Improper zip structure will result in Gradescope autograder failure, please adjust the
folder structure and resubmit if you encounter “Sanity Test Failure” on Gradescope
• The correct folder structure should show
“BGPHijacking/” as a folder in front when uploading onto Gradescope
• Please note that the autograder may take up to 10 minutes to process your assignment.
As the deadline approaches and traffic increases, the grading time may be further
delayed, and in some cases, the system may time out. To avoid these issues, we strongly
recommend submitting your assignment early. We are not responsible for delays caused
by last-minute submissions.
13
WHAT YOU CAN AND CAN NOT SHARE
While discussion of the project, in general, is always permitted on Edstem, you are not permitted
to share your code generated for the graded part. You may quote snippets of the unmodified
skeleton code provided to you when discussing the project.
• You may not share the topology diagram you created in. (private post to instructors is
always OK)
• You may not share your IP addresses publicly (private post to instructors is always OK)
• Sharing of completed code pseudo code is ok, but if in doubt, please make a private post
to the instructors.
14
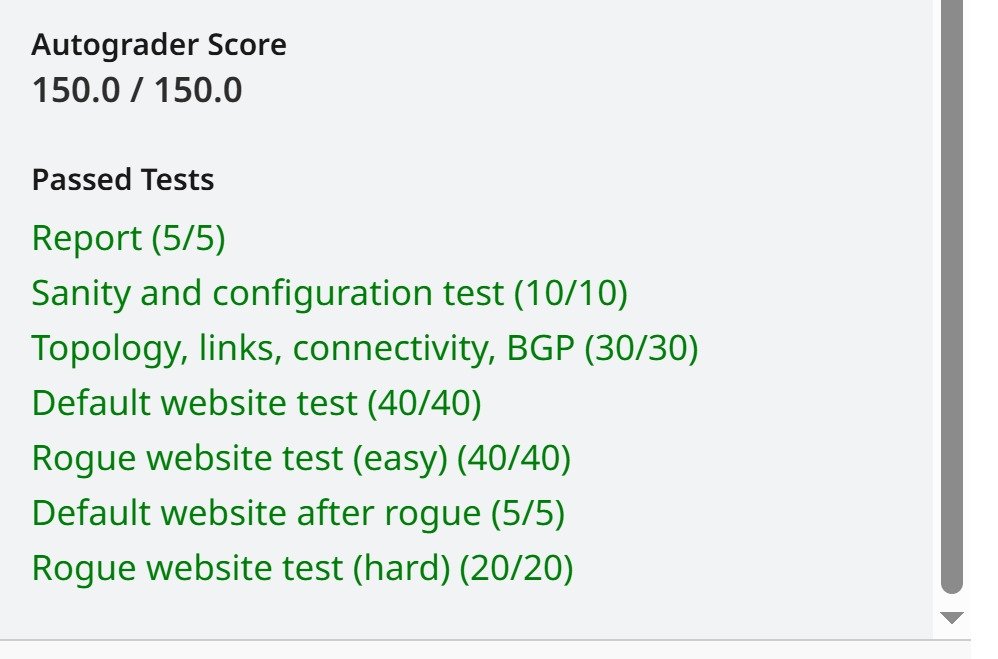
RUBRIC (out of 150 points)
5 pts Fig 2 Topo
Diagram
For turning in the correctly named Topology diagram file: fig2_topo.pdf
Please use legible configuration values! Even autograder give full points
on the diagram, we will manually deduct points of this part if it’s not
legible.
125 pts BGPHijacking
Part 1
For accurately recreating the topology, links, router configuration, and
attack per the instructions. Partial credit is available for this rubric item as
follows:
10 points for efforts in router configuration (zebra/bgp).
30 points for accurately recreating the topology, links, connectivity.
40 points for seeing default message when you run website.sh, on hosts
h[1-5]-[1,2], we will randomly choose some hosts to test.
40 points for seeing attack message with website.sh h5-1 after running
start_rogue.sh, and default message on other hosts.
5 points for seeing default message after stop_rogue.sh is run.
20 pts BGPHijacking
Part 2
20 points for seeing default message on h1-1, and attack message on
other hosts (h[2-5]-[1,2]). We will randomly choose some hosts to test.
[1] This Project inspired by a Mininet Demo originally presented at SIGCOMM 2014.
Bibliography
Cloudflare. (n.d.). Retrieved 2020, from cloudflare.com:
https://www.cloudflare.com/learning/security/glossary/bgp-hijacking/