

Description
Overview
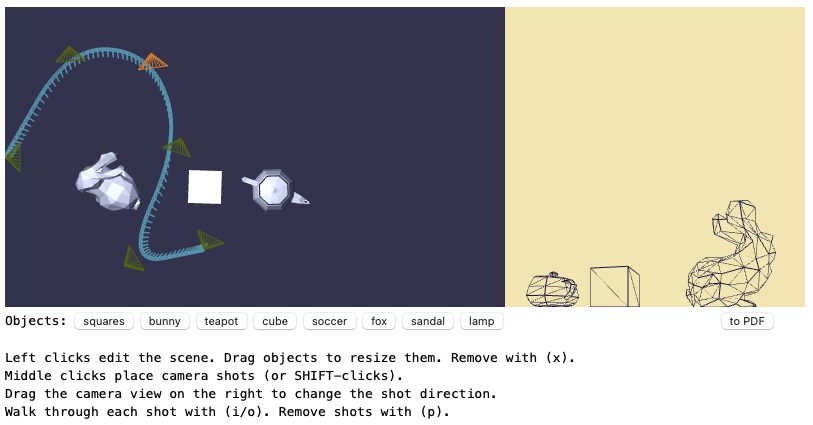
The flip book app that we worked on for Project 3 has a particularly unsatisfying quality to it. Editing the camera’s path can be tedious, and so a walk-through creator will tend to place very few camera positions into the scene. This leads to a very jarring animation in the resulting PDF, with few pages to flip through. The only option for an editor is to place a lot of cameras along the path, and have them close together, so as to have a smooth animation of the walk through the scene. As we already just noted, this isn’t easy to do in the app.
For this assignment we fix that issue. We change the editor so that the explicitly placed camera sites are “control points” that help to define a path. But then we produce a smoothly tracking collection of camera shots that form a much larger number of frames in the walk-through. To do this, we use the curve technology we described in lecture the last several weeks.
A sample solution for this Project 4 assignment is shown in Figure 1. Just as in the old app, a walk-through creator has laid out a series of camera shots as a polygonal path. And then the app has computed a series of “in-between” camera locations and view directions that smoothly vary from shot to shot. For each placed shot, excepting the first and the last, the app produces 16 frames. Each frame is built by taking camera information from a few of the explicitly laid out shots, using some combination of them to blend their information into a novel in-between camera shot.
A flip-book that results from this smooth path can be downloaded using this link. There is a page for each frame, one for every in-between shot that the app computes.
Starting code
You can just work from the code you were building in Project 3. Even if the code for generating PDFs isn’t fully working, you can still enhance it to complete the work of this project. You’ll add code that draws the in-between camera shots. (And if you complete a bonus exercise, you’ll add code that allows the app user to run a movie of the smooth walk-through on the preview screen just right of the editor.)
For those of you still trying to get Project 3 completed, this project gives you some extra time to work out the bugs of your PDF generation and submit an update for some partial credit. (Those of you with a working, or near-working, Project 3 will just get this additional credit for that work here.)
Assignment
Edit the WalkThru class so that it can compute a sequence of SceneCamera objects that smoothly vary according to its array this.shots. Your method should use Chaikin’s “corner cutting” algorithm applied to the control polygon given by that sequence. You should use the version of Chaikin subdivision that starts and finishes with the begin and end shots, but smooths out the corners specified by the other shots. If the edited shots are given by
then you’ll compute (via Chaikin’s scheme) the set of SceneCamera objects
These are the result of applying Chaikin’s “split and average” step four times. The in-between camera placements should be depicted in the walk-through editor view. The smoother walk-through should be used to generate the pages of the PDF generated by the [to PDF] button.
Below I take you through some of the details of what’s needed.
Smoothly Varying Camera Locations
You need to compute a sequence of camera positions from the sequence of user-specified shots. The user-specified ones are held in the array gWalkThru.shots managed by the code flip-book.js. The sequence that you compute should be those that result from a fairly straight-forward application of Chaikin’s scheme that we outlined in Lecture 07-1. We cut corners by a 3434 and 1414 weighting rule applied to the line segments of each corner, computing two points for each corner.
For this coding, I recommend you define a method combo(amount,other) in class Shot that performs a convex combination of one camera shot (this) with some other camera shot (other) according to a parameter amount. That parameter is assumed to be a value between 0.0 and 1.0. This is easy to determine for the position of the two Shot objects using the geometry libraries as below:
this.position.combo(amount, other.position)With this defined, you can then define a Chaikin subdivision of a sequence of shots by repeatedly applying your Shot.combo method with weights of 0.75 and 0.25.
Writing the portion of the Shot.combo that handles position is easy. Combining this.direction and other.direction is less straightforward. I say more about this calculation just below.
Smoothly Varying Camera Orientations
In our application, a shot’s orientation is given by a unit vector living within the plane of the floor. We need to smoothly vary this direction from shot to shot for the calculation of our curved walk-through. Since we are using subdivision to perform this work, we just need a way of defining the linear interpolation between two camera directions. This would be provided by the combo method of Shot just mentioned above. The method needs to build a new direction from this.direction and other.direction.
I’ll let you work out the details of this.
As inspiration, recall that in lecture 07-2 that we described a scheme for interpolating between two quaternions q0q0 and q1q1, with a q(α)q(α) parameterized by α∈[0,1]α∈[0,1]. It was defined as follows:
You could do something similar, although you need not use quaternions to accomplish this. It can be a bit simpler since direction is essentially just a unit vector in 2-D.
One issue that might arise in your handling of camera shot directions is that there are several ways to sweep (i.e. spin) the camera direction from one shot to the next. For example, suppose you model a shot direction as an angle within the plane. When you move from a shot angle θ0θ0 to shot angle θ1θ1, it might be more natural to instead move to a shot angle of θ1±2πθ1±2π (in radians). And this choice might depend on what the prior camera directions where and/or where the next directions are headed. You need not address this issue in your submitted code. If you do, however, please to tell me how you addressed it.
The Walk-Through Preview
You’ll want the editor to show the curved path rather than the control polygon of the curved path. To do this, you should change the code for drawCameraPath in flip-book.js so that it renders the curve instead of the polygon. You’ll find two loops in that code. One loop renders each edge of the control polygon. A second loop draws each of the camera placements. Modify the first loop so that it shows all the in-between shots and their directions.
BONUS
A bonus exercise is to add a feature so that an editor can view a movie of the walk-through within the app’s display, rather than generating the PDF. A user could press, say, the [SPACE] key and that could kick off an animation sequence in the shot preview.
You can control an animation by a set of global variables that indicate whether the app should be animating the walk-through sequence, and how far along it is. You append some code at the end of the draw function that requests that another frame gets drawn right after a frame was just drawn. Here is some code I used for my own solution:
    if (gAnimateWalkPreview) {
        gTick += 1;
        if (gTick % 100 == 0) {
            gPreviewFrame += 1;
            if (gPreviewFrame == gNumberOfFrames) {
                gAnimateWalkPreview = false;
            }
        }
        glutPostRedisplay();
    }
In the above, I increment a variable gTick each time draw is called and I am animating the walk-through preview. Every 100th time, I advance the frame of that animation to the next shot. If I’ve hit the last shot in the sequence, I stop the animation. And then I request another call to draw with glutPostRedisplay();.
What To Hand In
Submit the full code that supports the application by the project deadline. Also submit a submitted.md or submitted.txt file that describes the status of your code. Please include your name in that file to make it easy for me to look at your submitted work. Provide a sample .PDF of a walk-through that you set up, along with a screen shot of the scene set-up that produced it.
As usual, it’s always best to submit what you’ve completed by the deadline, even if it’s not fully working. Give details of where things stand in your submitted file. And then feel free to later revise what’s submitted at a later date when you get more things working.